Showing posts with label Thanksgiving. Show all posts

Wednesday, November 28, 2012

Thanksgiving Leftovers Casserole


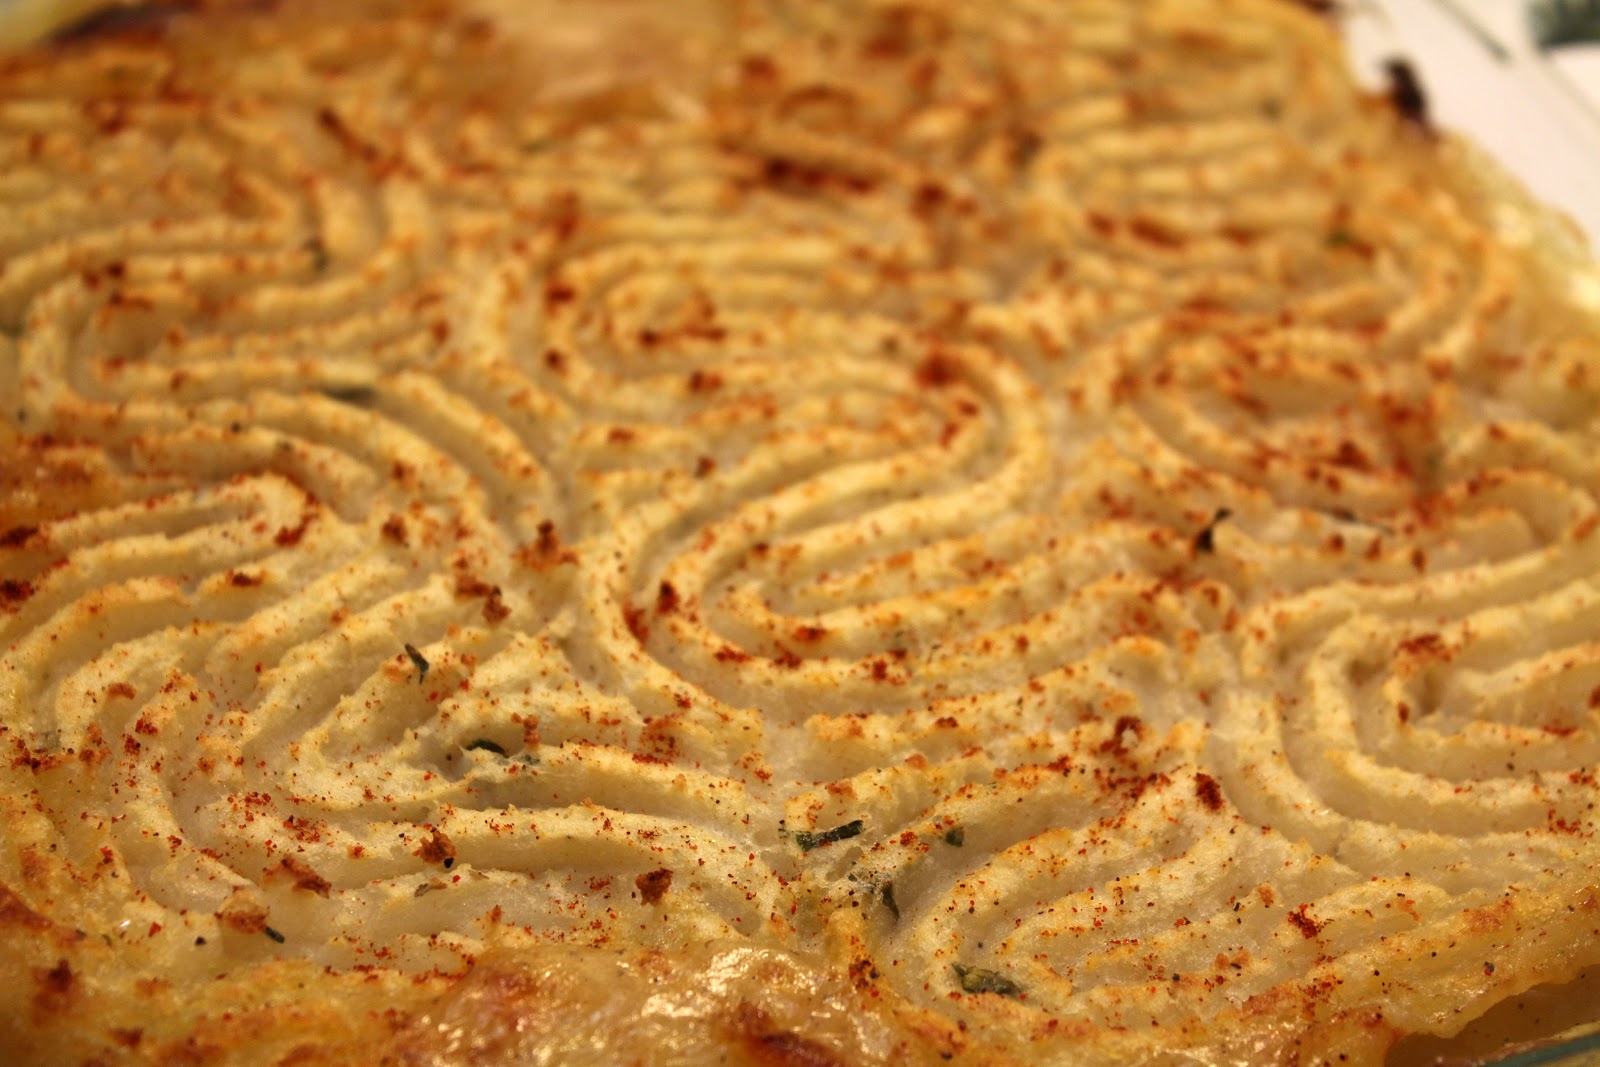
Here's an easy, dairy free way to use up leftover Thanksgiving mashed potatoes, gravy, turkey, and vegetables. If you used the recipe for Dairy Free, Fat Free Mashed Potatoes, you're already set to make this recipe dairy free.

Reheat your leftover mashed potatoes using a few splashes of vegetable broth or chicken broth at a time, microwaving in 1 minute intervals, then mashing with a fork until soft again and easy to spread.

My gravy was just turkey drippings thickened with cornstarch, but it solidifies when refrigerated  so I microwaved about a cup of this until liquified again.

I used green beans and carrots in this recipe, but you can use any leftover vegetables, especially peas, corn, carrots, and green beans. If they are large just chop them up before adding them to the dish.

The measurements can be adjusted depending on how much leftovers you have. Just judge it as 1 part turkey, 1 part gravy, 2 parts vegetables, and 3 parts mashed potatoes. I added the paprika mostly for color, and the thyme to flavor the vegetables which were not cooked. If your vegetables are already flavored, you may not need any spices, salt, or pepper. It's like a Thanksgiving version of Shepherd's pie!

Ingredients:

1 cup cooked turkey, chopped
2 cups mixed vegetables
1/2 cup-1 cup turkey gravy
3 cups mashed potatoes or more
1/4 tsp paprika (optional)
1/4 tsp thyme (optional)
sea salt and black pepper to taste

Directions:

1. Reheat your mashed potatoes and gravy until potatoes are soft to spread and gravy can be poured. Add chopped turkey, vegetables, salt, pepper, and thyme to a deep 8x8 casserole dish and mix together.


2. Pour half the gravy into the vegetables and mix. Then pour remaining gravy to fill in the space until turkey and vegetables are just covered.

3. Dollop mashed potatoes on top of the gravy mixture, and spread until fully covered and flat. The thickness of the mashed potatoes really depends on how much you want to use, and how deep your dish is. Once spread until smooth, you want to fluff the potatoes so that the tops get a little crispy in the oven. You can use a fork to rough it up or make a pretty design by carving into the smooth potato surface. Sprinkle with paprika.


4. Bake for 25 minutes at 350 degrees Fahrenheit or until hot. Set the oven to broil, and broil for 3 minutes or until the tips of the potatoes get a little bit browned. Allow to cool for a few minutes and then serve.

For dessert, leftover cranberry sauce mixed with cool whip--yum!


Monday, November 19, 2012

Simple Cranberry Sauce


Cranberries are beautiful to photograph. The rich red color reminds me of Christmas decorations like holly berries and poinsettias, complete with pine trees and snow. It's not snowing in California, but we are still getting into the holidays. Thanksgiving is almost here, and cranberry sauce's tart, yet sweet flavor goes great with turkey. Eat it on hot sliced turkey, or cold on a leftover turkey sandwich. It stays for weeks in the fridge. I spiced mine up a bit and added some orange zest for a citrusy flavor. Cranberry sauce is so easy to make out of fresh cranberries, I won't buy the canned stuff ever again.

Ingredients:
3 cups fresh cranberries
1 cup water
1 cup sugar
1 tsp orange zest
1/4 tsp allspice

Directions:
1. Mix water and sugar together in a medium saucepan and bring to a boil over medium high heat.

2. Add cranberries, return liquid to a boil and stir occasionally for 10 minutes. Skins will pop and it will begin to convert to a jam consistency.


3. Remove from heat and add zest and allspice. Cool to room temperature to serve. The sauce will thicken upon standing.


Sunday, November 18, 2012

Delicious Dairy Free, Fat Free Mashed Potatoes


Why didn't I make these before? Adding mayo and Smart Balance to mashed potatoes tastes delicious and is a great dairy free option, but it adds a lot of fat. A healthier option to try for your Thanksgiving feast is this recipe right here. It has so much flavor! Use vegetable broth to make it vegan. Serves 13-15 people.

Ingredients:
12 russet potatoes, peeled and cubed
5 1/2 cups low sodium, fat free chicken or vegetable broth
2 tablespoons plus 2 teaspoons chopped fresh chives
1/2-1 teaspoon black pepper, to taste
1/4 tsp salt (optional)

Directions:
1. Cover peeled, cubed potatoes with desired broth in a large pot. Bring to a boil over high heat.

2. Once boiling, reduce heat to medium low, cover, and simmer 12-15 minutes or until tender. Try testing with a fork for softness. The potato cube should break apart easily.

3. Drain, but reserve 1 cup of broth.

4. With a hand masher or electric mixer, mash potatoes with 1/4 to 1/2 cup reserved broth, adding a little at a time. Be careful not to overdo it or the potatoes could be too moist.

5. Stir in chives, salt, and pepper.

Wednesday, November 23, 2011

Thanksgiving Turkey Tips

How do you make the tastiest, tenderest turkey with the least amount of work involved? Forget brining and basting, just cook it in a Reynolds Oven Bag. This is the not-so-secret method of my grandma's turkey cooking, passed down to me on my first Thanksgiving as a married woman. I love simple turkeys best--they don't taste like salt and flavorings, they taste like real, tender, moist, delicious turkey. Then you make a thick gravy from the drippings and pour it over everything. There is nothing quite like it. Here are a mix of tips my grandmother gave me, and also some from Reynolds, when making a turkey in the oven bag.

Tools you will need:

Reynold's Oven Bag, Turkey Size
Large baking pan--we get the disposable pans.
A turkey thermometer if your turkey doesn't come with one
If you are stuffing it, get some some string to tie the legs together, and a wire skewer for the neck

Ingredients:

Frozen turkey, any size
Olive oil or canola oil
Sea salt and black pepper
1 yellow onion
3 celery stalks
1 tablespoon of flour
Your favorite stuffing
*Optional: Paprika

Directions:

1. Thaw your turkey according to directions on packaging. Ours was 23 lbs. and needed three days to thaw in the refrigerator. It was still frozen in the inside when we opened it, so we rinsed this part under warm water. I should have thawed it for four days, not three.

2. Preheat oven to 350 degrees Fahrenheit and then clean out the turkey. Take out the parts inside the neck and chest cavity--reach in and pull out everything that shouldn't be there. Rinse it well, like
giving it a bath. Take off the oil gland if it's still on the tail--ours was. Place your cleaned turkey on a cutting board or clean surface and pat your turkey dry with paper towels.

3. You can take this time to prepare your favorite stuffing if you haven't already. Follow the poultry preparations on the bag. My favorite is a
whole grain cranberry stuffing in a bag. We made two batches, including fresh diced onions and celery as it called for in the poultry directions.

4. Now you can prepare the oven bag. Open it up and add a tablespoon of flour. Close the opening and shake it around. This will coat the bag and prevent it from sticking to the turkey and bursting. Slice a yellow onion and your celery stalks and add them to the bag--your turkey will sit on top of them.

5. Rub the turkey in your choice of oil. We once used a mixture of butter and olive oil, but we don't use butter around here anymore. It turned out great, though. This year we used canola oil and it still turned out fantastic. After the turkey is covered, lightly sprinkle sea salt and black pepper over every inch of it. If you want a browner turkey, sprinkle paprika over it. We haven't tried this yet but I'm sure it works.

6. Put the stuffing in the chest cavity and neck and close so that the stuffing doesn't fall out when you move the bird.

7. Place the turkey in the Reynold's bag on top of the vegetables. The tricky part is which side do you place it on? Traditionally, you would put it on it's back, for a pretty, brown turkey. But for flavor, my grandma recommends putting it breast side down. She says this makes the moistest turkey. So that's what we did. Make sure you tie it securely with the provided nylon tie.

8. Cut six half inch slits on top of the bag, and insert your turkey thermometer through one of these slits, into the thickest part of the inner thigh, not touching the bone. Tuck in the ends of your bag so they don't burn in the oven.

9. Now comes one of the best parts about the oven bag--the baking time. Using this method reduces the baking time, so it's really convenient, especially if you have a very large turkey like we did. Bake 2 to 2 1/2 hours for a 12 to 16 lb. turkey, 2 1/2 to 3 hours for a 16 to 20 lb. turkey, and 3 to 3 1/2 hours for a 20 to 24 lb. turkey. Add 1/2 hour for a stuffed turkey. When it's done the red thermometer will pop up. We cooked ours for a little over four hours, but without the bag it could have taken six hours.

10. Take your turkey out and let it sit for 15 minutes before loosening the bag. If you are making gravy--this method produces an insane amount of tasty turkey drippings. It will be flavored by the onion and celery, salt and pepper. We cut a corner of the bag and drain it into a pot, straining any stray onion slices and stuffing. Read on to make your gravy. Happy Turkey Day!


Making the Gravy

Ingredients:

Turkey drippings
Cornstarch

Directions:
1. Dissolve 1 tablespoon of cornstarch in 1 tablespoon of water and set aside.
2. Stir into turkey broth with a wire whisk, and heat on medium high. Bring to a boil and stir constantly. If the gravy is not thick enough, or if you have tons of gravy like we did, add another tablespoon of cornstarch and water mixture until desired thickness. Pour over turkey and mashed potatoes. Mmmm.